
How to Get a Professional Looking Finish with Cement Rendering
The weather in Australia can be harsh. From scorching heat during the summer to rain and wind during winter, the elements can take a toll on your home’s exterior walls. One way you can protect your house against the elements is by applying a coating that can act like a barrier against the heat, rain, and other weather changes.
And, that coat can come in the form of cement render.
If you are not new to rendering projects, then you may be wondering how you can make your work look better. More specifically, how can you give a more professional finish to your cement rendering project.
In this article, we will provide a few tips that can help you achieve just that.
Types Of Rendering
There are several types of renders available and the material and type of surface they are properly applied to can determine how well the finish will turn out and how long it will last. Deciding on this detail can make a big difference in how the render will look like.
Here are the most types of renders:
- Concrete rendering
- Acrylic rendering
- Polymer rendering
What Is Concrete Render And What Is It Used For?
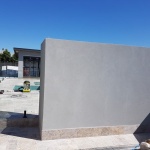
Concrete renders result from a mixture of sand, water, and lime or clays. It is mostly used on hard surfaces, such as concrete, brick, or stone, sometimes also on exterior walls that have been painted and sanded well beforehand. This render gives a smooth finish look.
Concrete plaster can also be used on retaining walls, fences, as well as interior walls and exterior walls.
Related article: What’s The Difference Between Cement Render And Plaster?
Advantages Of Using Cement Render
Here are some of the reasons why you should opt for cement rendering:
- Provides a cleaner, smoother, and more aesthetically pleasing finish on hard surfaces than the other two options;
- Can be produced in a wide variety of colours (if you choose to use coloured pigments;)
- Can be found in several textures, from a smooth finish to a textured finish (depending on the sand size added;)
What Actually Creates a Smooth Cement Render Finish?
Best Conditions for a Professional Finish
Even the best technique can fail if conditions are wrong. Cement render performs best when applied in mild, stable weather.
Avoid rendering in:
-
Extreme heat
-
Direct sunlight
-
Strong wind
-
Heavy rain or high humidity
Hot conditions cause the render to dry too quickly, leading to cracks and weak bonding. Cold or wet weather slows curing and can cause uneven drying.
Ideally, render should be applied on a dry day with moderate temperatures. Controlled conditions allow the render to cure gradually, resulting in a smoother, stronger finish.
How To Do A Rendering Job Like A Pro
First, you will need a few tools, such as a metal spatula, wooden trowel, plasterer’s hammer, styrofoam float, a soft brush, a steel brush, measuring tape, and others.
1. Proper Preparation of the Wall
If the concrete wall is chipping remove all the old plaster then wet the wall with a hose. This process helps to remove dust and old plaster debris.
New plaster should be applied to slightly damp surfaces that have been previously coated with PVA-type liquids. This can speed up the adhesion and optimum drying of the plaster over time.
2. Mix the Ingredients
Use 1 part hydrated lime to 3 parts sand. Several additives can make your mixture (and therefore your plaster) more waterproof and easier to handle, but it would be better to discuss this aspect with a specialist.
To get the desired result, make sure you mix the right quantities and mix them extremely well.
3. Apply a Coat of Rendering
Apply the plaster in two layers. Be careful when applying it to ensure that it actually sticks to the wall, and does not fall off.
Before the first coat hardens, use a notched trowel to create some lines in the cement. This helps the second layer adhere better.
4. Apply the Finishing Coat
After the first coat has hardened, wet the wall again and apply the next coat. This topcoat should be softer than the first. For a smooth finish use a sponge or trowel to smooth out excess material before it hardens.
Common Mistakes to Avoid
-
Applying render in extreme heat or rain:
High temperatures cause render to dry too quickly, leading to cracks and weak adhesion, while rain can wash away fresh render or cause patchy, uneven finishes. -
Skipping surface cleaning or priming:
Failing to clean or prime the wall prevents proper bonding, allowing dust, oils, or old paint to interfere with adhesion and reduce the render’s lifespan. -
Using too much water in the mix:
Excess water weakens the mixture, making the render more prone to sagging, shrinkage, and cracking as it dries. -
Not allowing coats to cure properly:
Each layer needs adequate curing time to gain strength and prevent internal stress. Rushing this step can result in weak adhesion and surface cracks. -
Rushing the finishing stage:
Finishing too early or too aggressively can ruin the texture, cause uneven surfaces, and compromise the overall look and durability of the render.
Get Specialised Help
Poor application can result in an uneven finish, structural weaknesses, and costly repairs down the line.
It’s best to turn to a professional, and we’re the best in premium cement rendering services. Contact us at 0402 283 119 for more information about cement rendering Sydney.
Frequently Asked Questions
How long should cement render cure before painting?
Cement render should generally cure for up to 28 days before painting. This allows moisture to escape and helps prevent peeling or blistering of paint later.
Why does cement render sometimes look patchy after drying?
Patchiness can occur due to uneven drying, inconsistent mixing, variable wall absorption, or changes in weather during application. Proper preparation and controlled curing help reduce this.
Can a smooth cement render finish crack more easily than textured finishes?
Yes. Smooth finishes can make hairline cracks more visible, whereas textured finishes help disguise minor movement or imperfections.
Does weather affect the final appearance of cement render?
Very much so. Heat, wind, rain, and humidity all influence drying time and finish quality. Ideal conditions help achieve a more uniform, professional result.
Can cement render be reworked if it starts to dry too quickly?
Only to a limited extent. Once render begins to set, overworking it can damage the surface and weaken the finish. This is why timing and experience are critical.
-

Best Paint for Rendered Homes | Expert Selection Guide
The best paint for a rendered home is a high-quali
-

What Paint To Use For Cement Render
Cement render is such a great addition to any hous
-
How To Cement Render A Garden Wall
Interested in a new render finish for your garden